Memang sudah banyak situs yang menyediakan tools secara gratis untuk download video di youtube, mulai dari downloader online, software, maupun add-ons dan plugin untuk suatu browser.
Tetapi bagaimana cara download video di youtube tanpa menginstall software maupun add-ons terlebih dahulu? anda bisa memanfaatkan javascript untuk mendownload video tersebut.
Caranya adalah sebagai berikut :
1. Buka video di youtube yang anda inginkan. Misalnya :
http://www.youtube.com/watch?v=E3keLeMwfHY
2. Setelah itu Copy dan Paste javascript berikut ini di Browser anda (Ganti URL browser anda dengan salah satu javascript di bawah ini).
Download Regular Quality Youtube Video Direct Links [RQ] :
javascript:window.location.href = 'http://youtube.com/get_video?video_id=' + yt.getConfig('SWF_ARGS')['video_id'] + "&l=" + yt.getConfig('SWF_ARGS')['l'] + "&sk=" + yt.getConfig('SWF_ARGS')['sk'] + '&t=' + yt.getConfig('SWF_ARGS')['t'];
Download High Quality Youtube Video Direct Links [HQ] :
javascript:window.location.href = 'http://youtube.com/get_video?video_id=' + yt.getConfig('SWF_ARGS')['video_id'] + "&fmt=18&l=" + yt.getConfig('SWF_ARGS')['l'] + "&sk=" + yt.getConfig('SWF_ARGS')['sk'] + '&t=' + yt.getConfig('SWF_ARGS')['t'];
Download High Definition Youtube Videos Direct Links [HD] :
javascript:window.location.href = 'http://youtube.com/get_video?video_id=' + yt.getConfig('SWF_ARGS')['video_id'] + "&fmt=22&l=" + yt.getConfig('SWF_ARGS')['l'] + "&sk=" + yt.getConfig('SWF_ARGS')['sk'] + '&t=' + yt.getConfig('SWF_ARGS')['t'];
3. Kemudian tekan Enter. Maka nanti akan muncul pertanyaan untuk menyimpan file video tersebut.
4. Klik OK dan video akan mulai di download.
Yuk download veideo Youtube dengan Java
Wednesday, April 7, 2010
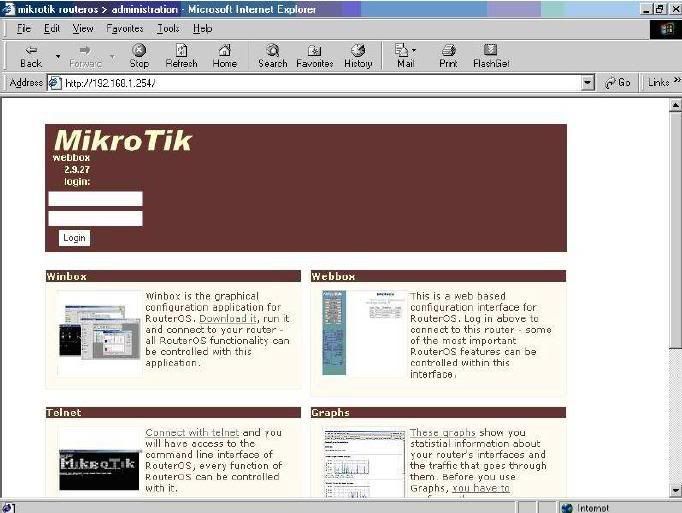
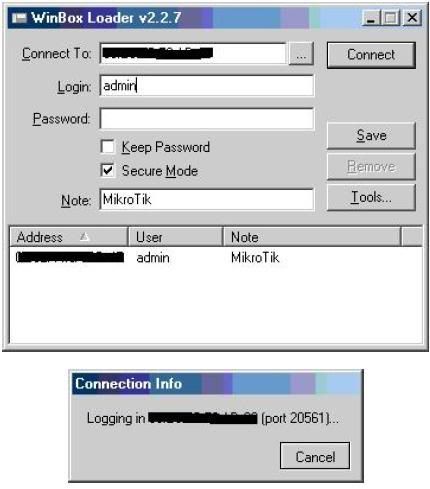
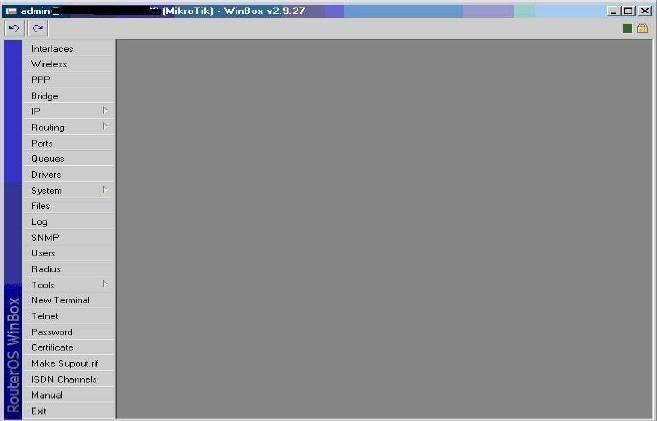
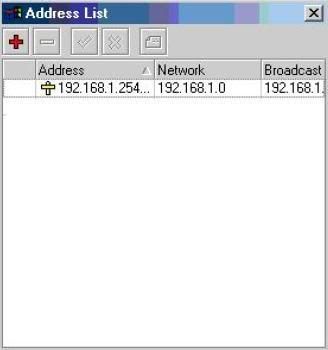
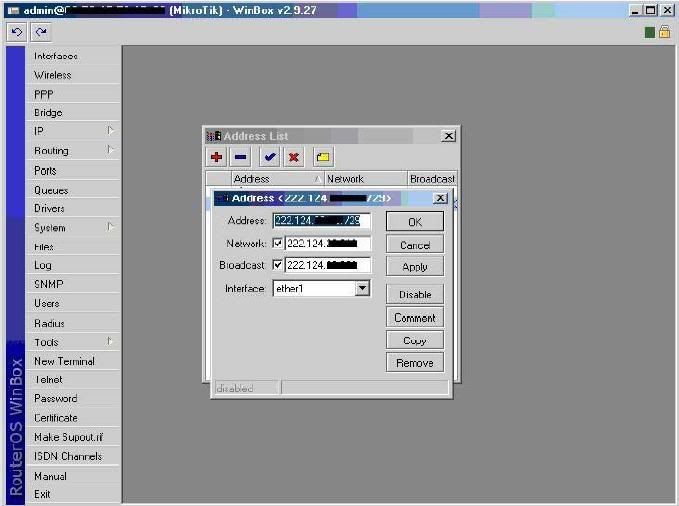
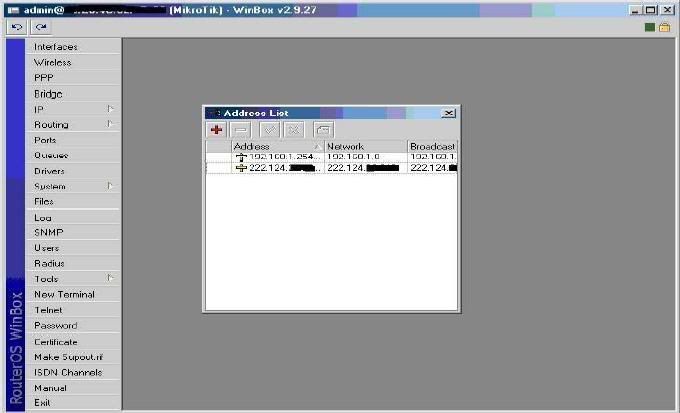
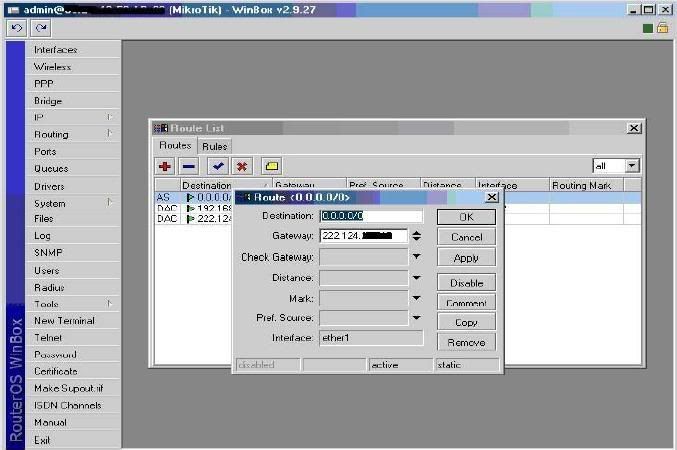
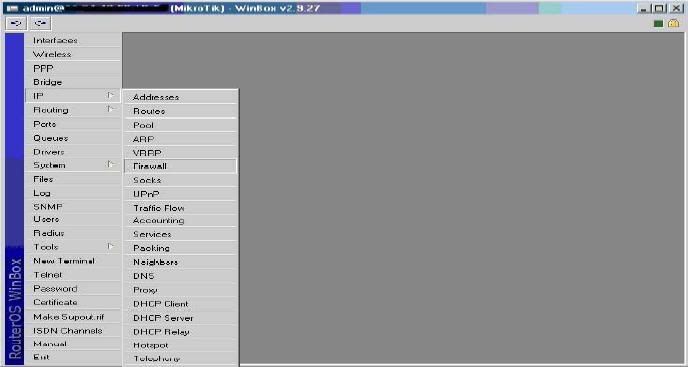
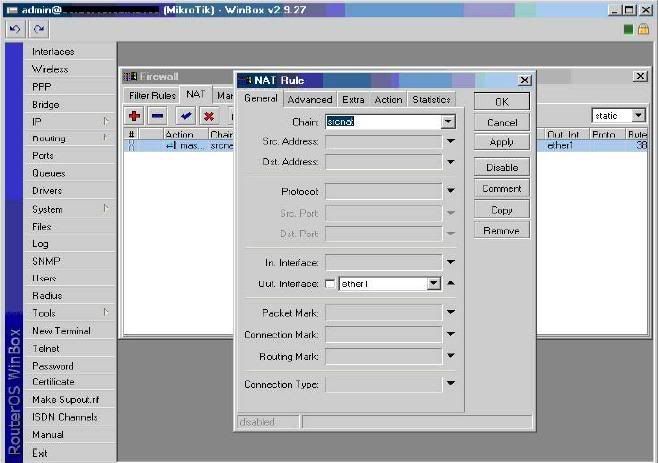
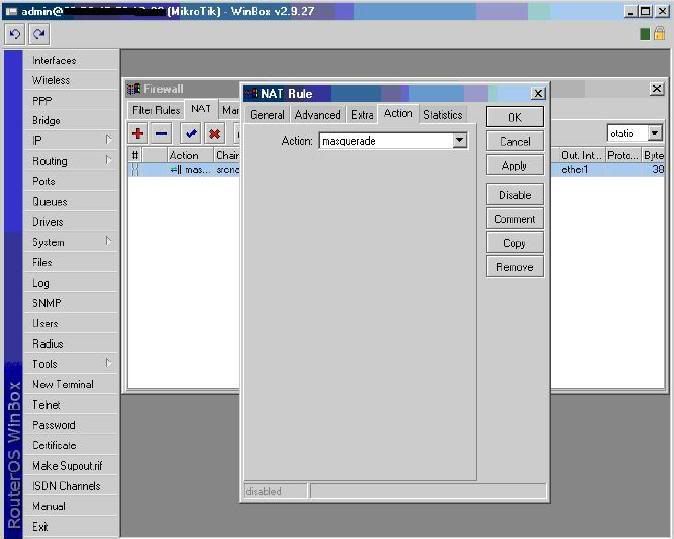
Bypass [ hack ] login ke HOTSPOT punya MIKROTIK
Bagi yang suka utak atik masalah jaringan terutama dengan perangkat perangkat mikrotik .... kalian semua wajib mencoba trik yang satu ini ....
Bagi yang maw streaming silahkan di play saja video di bawah ini
Klo yang maw download bisa di ambil disini
Selamat mencoba !
Yuk Belajar Masang [ Crimping ] Kabel UTP
Friday, April 2, 2010
Alat dan bahan yang di butuhkan

- connector Rj45

- kabel UTP
- tang crimping


- kabel tester
Ada 2 jenis crimping padakabel RJ45 yang tergantung pada pemakaiannya.
- Tipe Straight
* Sambungan dari router kepada hub/switch.
* Sambungan dari server kepada hub/switch.
* Sambungan dari workstation kepada hub/switch
Urutan warna yang benar untuk kabel jenis ini adalah : Putih Orange – Orange – Putih Hijau – Biru – Putih Biru – Hijau – Putih Coklat – Coklat
Urutan ini sama untuk kedua ujungnya.Gambarnya :

- Tipe Cross
Urutan warna yang benar untuk jenis ini adalah :
Putih Orange – Orange – Putih Hijau – Biru – Putih Biru – Hijau – Putih Coklat – Coklat
sedangkan pada ujung satunya urutannya sebagai berikut :
Putih Hijau – Hijau – Putih Orang – Putih Coklat – Coklat – Orange – Biru – Putih Biru
pada jenis cross ini memang kedua ujungnya memiliki urutan yang berbeda. Gambarnya sebagai berikut :

Silahkan dipraktekkan ..... mudah - mudahan bermanfaat
Yuk .. Belajar Install MIKROTIK
Kemudian di extrack dan kemudian burn ke CD itu file ISO nya.


Show Hidden File pada Windows Vista
Berikut langkah - langkah " Show Hidden File " pada Windows 
- Close all programs so that you are at your desktop.
- Click on the Start button. This is the small round button with the Windows flag in the lower left corner.
- Click on the Control Panel menu option.
- When the control panel opens you can either be in Classic View or Control Panel Home view:
If you are in the Classic View do the following:
- Double-click on the Folder Options icon.
- Click on the View tab.
- Go to step 5.
If you are in the Control Panel Home view do the following:
- Click on the Appearance and Personalization link.
- Click on Show Hidden Files or Folders.
- Go to step 5.
- Double-click on the Folder Options icon.
- Under the Hidden files and folders section select the radio button labeled Show hidden files and folders.
- Remove the checkmark from the checkbox labeled Hide extensions for known file types.
- Remove the checkmark from the checkbox labeled Hide protected operating system files. Once this is done, your Folder Options screen should look similar to the following image.

- Press the Apply button and then the OK button.
Install Routerboard dengan Net Install
Pakai net install saja,
Pertama cari kebal serial null modem, matikan rb
- pakai hyperterminal set baut rate 115, data bit 8, parity none, stop bit 1, flow control, none
- nyalakan rb sebelum 2 detik tekan sembarang
- pilih O (pilih boot device) dan pilih ethernet.
- jalankan netinstall versi yang routerboard (nggak akan jalan kalau netinstall versi x86)
- klik netbooting isi dengan ip yang satu group dengan komp kita
- pilih paket yang mau diinstall
- klik install, tunggu prosesnya
- rebot kembali ke hyperterminal kembalikan lagi boot ke Nand
- selesai
meskipun kita melakukan format di Nand. license tidak terhapus, jadi kalau kita beli rb default level 4 akan tetep level 4 dan software id tidak berubah.
Semoga membantu.
Untuk lebih mantabnya ... silakan ikuti thread pada forum ini
Yuk .. Belajar Install MIKROTIK
Install Mikrotik Dengan Winbox
Kemudian di extrack dan kemudian burn ke CD itu file ISO nya.
Disable iklan pada Antivirus Avira
Thursday, April 1, 2010
Windows 2000 / Windows XP Pro
- Go to Start > Run
- Type gpedit.msc and click OK.
- Navigate through User Configuration > Administrative Templates > System.
- Double click "Don't run specified Windows applications".
- Enable it and click show.
- Add "avnotify.exe".
- Click OK on all open windows.
Alternate:
- Start > Run: secpol.msc (You can also access this program through 'Control Panel > Administrative Tools > Local Security Policy' this is useful if it is easier the location of this rather than the file name)
- Right click "Software Restriction Policies," Choose "New Software Restriction Policies." (Skip this step if there are subfolders in Software Restriction Policies already.)
- Right Click "Additional Rule" folder > New Path Rule.
- Where it says Path, Type the path of avnotify.exe on your computer, or use the Browse button to find it. (On XP64 using a default install of Avira, the path is: (C:\Program Files (x86)\Avira\AntiVir PersonalEdition Classic\avnotify.exe)
- Make sure the "Security Level" Dropdown menu is selected as "Disallowed"
- If you would like to make sure it went through correctly, open the Additional Rules folder, and verify the path and security level.
- Enjoy the absence of nag windows.
Convert Filesystem FAT jadi NTFS ?
Wednesday, March 31, 2010
To convert an existing FAT or FAT32 volume to NTFS, follow these steps:
- Click Start, point to All Programs, point to Accessories, and then click Command Prompt.
- At the command prompt, type the following, where drive letter is the drive that you want to convert:convert drive letter: /fs:ntfsFor example, type the following command to convert drive E to NTFS:convert e: /fs:ntfsNote If the operating system is on the drive that you are converting, you will be prompted to schedule the task when you restart the computer because the conversion cannot be completed while the operating system is running. When you are prompted, click YES.
- When you receive the following message at the command prompt, type the volume label of the drive that you are converting, and then press ENTER:
- When the conversion to NTFS is complete, you receive the following message at the command prompt:
- Quit the command prompt.
Show Hidden File pada Windows Vista
Berikut langkah - langkah " Show Hidden File " pada Windows
Pake bahasa Inggris gak papa yah ... sekalian belajar bahasa Inggris ....
Saatnya berburu file hidden !!!!
If you are in the Classic View do the following:
If you are in the Control Panel Home view do the following:
Acer Aspire One tidak nyala ( hanya layar hitam )


Acer Aspire 1 merupakan netbook mungil nan tangguh, namun sayang dibalik ketangguhan prodauk ini justru menimbulkan titik lemah yang kadang membuat kita emosaii, karena harus rajin meng-update BIOS setiap 3 bulan sekali ( hmmm kurang lebihnya segitu ).
Berdsarkan pengalamn yang ssaya temu, netbook ini menunjukkan gejala ketika di pencet tombol power layar tidak menyala dan hanya ada bunyi kipas serta lampu power yang menyala.... eiitss jangan panik dulu, itulah perilaku Acer Aspire 1 yang harus kita maklumi.. ( kqkqkqkq ).
Kalo kalian mengalami hal yang sama, nggak ada salahnya mengikuti langkah di bawah ( daripada ke Acer center bayar 600 rebu )
1. Siapkan sebotol aqua sedang [ optional ]
2. Formatlah sebuah USB memory stick min.256 MB [ pastikan USB ini bisa booting ]
3. Download file BIOS yang paling update dari websitenya Acer [ Acer Aspire One AOA110 dan AOA 150]
3. Cari file FLASHIT.EXE dan BIOS file ( ber-extensi *.FD ) letakkan kedua file tersebut ke root directory USB stick
4. Rename BIOS file menjadi: ZG5IA32.FD [ jangan sampe salah nulis nama file-nya ]
5. Cabut Flashdisk.
6. Matikan laptop Acer kamu , pastikan batere dan charger tertancap pada tempat yang benar
7. Pasang Flashdisk pada tempatnya.
8. Pencet secara bersamaan tombol Fn+Esc dan tombol power, pencet dan tahan tombol Fn+Esc sampe lampu power berkedip.
9. Setelah tombol power berkedip - kedip pencet sekali tombol power
10. Proses flashing BIOS berjalan, pastikan untuk tidak menekan tombol apapun, bila langkah - langkah yang kalian lakukan benar dan urut penuh kehati-hatian, makal laptop ini akan merestart untuk menghentikan proses flasing BIOS, dan netbook pun kembali menyala seprti sedia kala
Hmm ... akhirnya bisa juga !!!!
Install Windows XP Di Compaq CQ40 108/416 TU
SATA ACHI AMD DI COMPAQ CQ 40 (Untuk AMD n NVIDIA) 01. Nvidia Chipset – chipset_driver (2.3MB) 02. nForce Network driver – Nvidia nForce (3.3MB) 03. VGA/Display - Geforce Video Driver 5. install audiopatch.f4154lt.exe download 04. UAA Driver for HD Audio – sp33867_UAA4HDAudio.exe 05. Audio/Sound – download C783 audio driver (3MB) or try sp34386.exe 06. Modem – SP33742.exe (6MB) 07. Wireless - WIFI driver sp34152.exe (261 KB), sp34510_HP Wireless Assistant.exe (3.2MB) 08. Webcam – sp35414_HP 1.3MP Webcam Software Drivers.exe (5MB) 09. Dotnetfx2.0 – dotnetfx_2.0.exe (22MB) 10. Touchpad – sp35444_Synaptics Touchpad.exe (14MB) 11. Card Reader – Realtech 5-in-1 Card Reader (2.1MB) 12. Quick launch – sp29255_HP Quick Launch Buttons.exe (14MB) 13. Battery – sp32299_HP Battery Check.exe (3MB) 14.Bluetooth – Wireless sp32883.exe FOR Nvidia Based Laptops
SMADAV - Antivirus lokal nan praktis
Tuesday, March 30, 2010

Antivirus besutan anak bangsa ini mampu mendeteksi berabagai virus buatan lokal yang notabene sering merepotkan para pengguna komputer di negeri ini ....
Fitur yang paling saya gemari dalam antivirus ini adalah penguncian autorun pada flashdisk serta lock drive ( penguncian drive ) sehingga menyulitkan virus untuk menulari falshdisk maupun harddisk yang sering dipakai....
Yuk kita download versi terbarunya disini
Transformers Revenge Of The Fallen 2009 IMAX Edition BDRip XviD-FRAGMENT
Friday, March 12, 2010
Mau liat Transformer Revenge of The Fallen ....... ?
Download aja lewat link di bawah

Lupa password deepfreeze 6 ?? [ ini solusinya ]
Sesuai dengan dinamika dan perkembangan jaman – banyak tips dan tools baru bermunculan ternyata termasuk juga untuk teknik untuk menjebol password Deep Freeze. Jika sebelumnya ada unfreezer untuk Deepfreeze 5 tetapi reset password harus dilakukan secara manual untuk Deepfreeze 6, maka sekarang ini beberapa tools penjebol password bahkan sudah bisa dipake untuk mereset password Deep Freeze versi 6 dengan sedemikian mudah dan cepat.
Kalau anda admin warnet dan sebangsanya, saya sarankan anda mengikuti perkembangan ini, karena tools ini benar-benar lumayan mengerikan. Bahkan kesan saya malah lebih mak nyus dari Unfreezer untuk DF 5.
Ada dua tools setidaknya setahu saya yang bisa dipakai untuk menjebol password DF 6 nyaris dengan seketika tanpa perlu susah payah. Ngeri deh
TOOLS PERTAMA bernama Anti Deepfreeze, kelihatannya karya programmer Arab.
Tampilannya seperti ini :

Cara menggunakannya sangat mudah, Tinggal pilih versi Deepfreeze lalu klik tombol Apply. Kemudian klik gambar icon Deepfreeze di taskbar ( Ctrl + Shift ) sambil klik icon .
Jika ada kotak password biarkan kosong, langsung masuk saja. Anda akan dibiarkan masuk konfigurasi Deepfreeze tanpa password
TOOLS KEDUA bernama Uninstall Deepfreeze, karya programmer Vietnam. Kalo program sebelumnya pake bahasa Inggris , program yang ini berbahasa Vietnam.
Tampilannya seperti ini :

Cara memakainya juga mudah meskipun berbahasa Vietnam, klik tombol Login, sampai tombol Login tidak aktif dan tombol Crack berubah menjadi aktif. Kemudian klik tombol Crack.
Langkah selanjutnya sama. Masuk ke file konfigurasi DeepFreeze dengan Ctrl+ Shift + klik icon DF atau cara lain. Bila ada kotak password abaikan, langsung masuk saja.
Semua cara ini dilakukan di Normal Windows, tetapi memang butuh restart komputer.
Sekali lagi, karena potensi dua tools ini agak tidak mengenakkan buat admin warnet cs, saya himbau rekan2 admin lebih memperhatikan masalah ini dengan menambah proteksi DF dengan tools yang lain. Meskipun
memang yang namanya program apapun tetap ada kemungkinan ditembus passwordnya.
=================================================================
Download dua tools tersebut di sini
Gunakanlah alat bantu ini dengan bijaksana.
Bukan cuma admin, user warnet juga sebaiknya berhati-hati karena aneka script, virus, keylogger, program aneh-aneh bisa dimasukkan oleh siapa saja di warnet-warnet. Alamax daku sendiri bisa ikutan pusing kalo main di warnet.
Special thanks to hackcenter.wordpress.com
Membuat USB Hiren's Boot [ english content ]
Thursday, March 11, 2010
Step 1
Connect USB Pen Drive (256Mb or more)
Step 2
Download and Run USB Disk Storage Format usb_format.zip![]() (34KB)
(34KB)

Step 3
Download and Run grubinst_gui ![]() grub4dos.zip (147KB)
grub4dos.zip (147KB)

Step 4
Copy grldr and menu.lst (from grub4dos.zip) to the usb drive
Step 5
Insert the BootCD (9.7 or newer) in the CD Drive and Copy everything from CD to USB Flash Drive
Step 6
Test Your USB Drive (read bottom of the page for troubleshoot)
